Showing posts with label Before and Afters. Show all posts

Sunday, April 17, 2011

Dirty Laundry...

Unfortunately, laundries are a necessary evil if you are concerned with wearing clean clothes (which I am)... but laundries rarely look any good.  Because its just a laundry, right?  If you had a choice of spending money on something more visible in your house, or in the laundry which only you see - well, a more visible room is always going to win isn't it!

Still... for some years, I have been dreaming of a light, airy, pretty laundry where I will wash the clothes for my family, bathed in sunlight, a fresh vase of flowers lightly scenting the air around me, gazing dreamily out into the garden through the old white sash window.....  Are you sharing my vision?  Or am I just weird?!  Let me give you a visual so you can get up to speed here - this particular laundry is the one I have been drooling over for years, it appeared in 2007 in (the now defunct) Notebook magazine... so dreamy :)  I love the Butler's sink and the light in this room.


Are you feeling it yet?  Well in order to really drive my point home, I went in search of more dreamy laundries for you and found the ones below on the Great Interior Design blog website under Best Laundry Room Design.  I came across this blog while googling for Laundry images, but I think I'll be a frequent visitor - the blogger in chief, Herman, has put together a great collection of inspirational images!  You can click on the links to read all his comments about these laundries and see more :)

These were the ones I particularly liked from the selection on offer - this one has an interior window for light


Photographer: Michael Graydon  Room Designer:  William MacDonald

This one is very cute with its little floral sink skirt! :)


Photographer:  Mark Burstyn

Can you believe this is actually the same laundry as the one above?  I love how functional it is!


Photographer:  Mark Burstyn

And I think this one has overtaken the Notebook mag one as my new personal favourite!  I have a sudden urge to paint my laundry blue... Lol


Photographer:  Donna Griffith

And this now brings me to my laundry... which is very sad!  It is tiny, dark, uninspiring and MESSY!!!  I have never been what one would call a natural homemaker... I'm am, by nature, a very messy person!  But in recent years I have worked very hard to be tidier - I have figured out that for me, messy house = messy mind.  I cannot focus when I have mess all around anymore.  And so I do make much more of an effort to keep things tidy...  and fortunately for me, Boofy is the type of person who gets in and gets things done, so he does a lot around the house too.  We also have the help of the wonderful Nat, who comes in and cleans for us on a regular basis - this is great for three reasons:  One, we don't have to spend our precious weekends cleaning and can focus on Alex instead - and Two: we have to make sure that everything is tidied and put away before Nat comes so she can get in and clean, so it keeps us tidy in between cleans - and Three: Nat is amazing and there is nothing better than walking into the house after a hard week to see the fruits of her labour - everything shiny and gleaming, the whole house smelling (and looking) lovely and clean :)

HOWEVER!  The laundry is our dumping ground for everything, as nobody but us ever goes in there... whenever we tidy the house in a hurry and something doesn't have a home, this is where it goes.  Couple with this the fact that we've all been sick, and consequently washing has not been the top priority (thank God our wardrobes and linen cupboard are full to bursting, so we still have clean clothes to wear and clean sheets and towels!)  Our laundry is a disaster... I'm really ashamed to post these photos (people who knew me before I started taking more pride in my surroundings will just be thinking a leopard never changes its spots! Lol) but when I walked into the laundry and saw this incredible mess this morning, something just snapped!  The rest of the house looks so nice, then I walk into the laundry to do a load of washing - and where the hell do I start??  Yikes!  Here goes.... I feel like I'm walking into the confessional here...


I know, its soooo bad isn't it :(  Especially after the beautiful images above.

I should back up and explain a bit about what we've already done in the laundry.  I don't have any before photos, but when we moved in it had lino tiles stuck on half the floor (yes, only half!), and they were impossible to pry up.  So we went to Bunnings and bought this bamboo floor lookalike lino - I cut it out and laid it myself right over the old tiles... not the most professional job, but it is the laundry after all, so we were pretty happy.  We also bought those two tall broom cupboards and two smaller cupboards - the tall ones are for the vacuum cleaner, stroller, ironing board, iron and cleaning products we need to keep high up.  The lower ones actually have divided washing hampers in them, so laundry is (supposedly!) sorted into colours and put down there ready to be washed - and the top provides a bench of sorts.

Anyway, I have been sick all week but got myself a burst of energy this morning (finally!  I've been waiting all week!)  so I rolled up my sleeves, got in and cleaned the whole thing up, sorted the washing, and prettied things up a bit.  And my laundry now looks like normal people live here (as opposed to filthy hoarders) - yay!!!  It is still not the light airy laundry with vast bench spaces that I really want, but at least its clean and a little nicer to be in... and as it turns out I've spent almost the whole day in there, we had a lot of washing to get through but I was really motivated and have caught it all up!  All the clothes were hung on portable lines inside with the ceiling fans on full - and we took 3 loads of sheets and towels to the laundromat to dry (we don't have a dryer at home - they chew the power and if we actually had one I'd use it far more than necessary out of laziness!  I'm not to be trusted!! Lol)

In terms of what I did to make it a bit more pleasant - I got this canvas I had hanging around in the garage, and some scrapbook paper and stick on letters from my (extensive) scrapbooking arsenal :)  I just trimmed and stuck the papers on and then added the 'LAUNDRY' letters onto it... I know its stating the obvious and not the best artwork, but it was 100% free, so I can live with it!  I am also very lucky that Boofy dutifully trotted on down to Aldi on Thursday and got me some pretty little laundry tins that they had on sale this week - sweet!  And of course, added one of my beloved fake Ikea plants (in lieu of the obligatory bunch of flowers in my dream laundries above).  Is there a place I wouldn't put a fake Ikea plant?  The answer is no my friends, no...  tragic I know... its an illness!! Lol

So here it is:


What do you think?  Well anything is going to be an improvement, but I'm pretty happy.  I need a bit more colour on the other side where my 'bench' is - I've seen the perfect runner on sale at Pillow Talk (hopefully they still have it) and I have a very large artwork in the garage that no longer suits our decor in the rest of the house, so I will probably add both of those sometime soon.  But for now, this will do :)

And while we're on the subject of great laundries, check out these photos that my friend Faith recently posted on Facebook - she has a funky new benchtop going on in her laundry which she loves... (its actually quite a similar look to the flooring I would have chosen if we could afford it, albeit in a different colour).


But check out this amazing view out the window!!!  I think I would never get any laundry done at all if I had this view to gaze out at!!


What a lucky ducky Faith is to have that view every single day :) 

And now that I've had my burst of energy and a productive day (although I didn't do all the work - Boofy featured heavily!) I am feeling a little tired and unenergetic again.... oh well, at least I managed to get something done!

Bye for now :)

Saturday, February 12, 2011

Totally floored...


Did you think I'd chucked it in?  Surprise, I'm back!  Excuse my long absence, we've had back to back weekends of interstate visitors, which has been awesome, but means if I want to give them my undivided attention (which I do), then blogging or completing blog-worthy projects has to wait - fine with me :)  So anyways, I've enjoyed my time with our visitors immensely, but now its back to business!  Today I'm all about floors!! 
When we moved into our house, we had a mish-mash of flooring and bare concrete…  The lounge room (as I've shown before) looked like this (in all its filthy blue, ripped and snagged glory - with added bits of bare concrete for good measure).  You can also see on the right hand side the step up from the lounge into the dining room…. You guessed it!  Bare concrete :)  Really, this is a terribly flattering photo for something that was so ugly in person!


The majority of the rest of the house was tiled (including the bedrooms) in the sort of pale terracotta type colour tiles you can see in the picture below.  We don't love the colour, it doesn't really match our colour choices for walls or furniture, so we set about exploring options to cover it.  Also to contend with was a crazy teal green type tile with a lovely bare concrete strip where the front door used to be….  Sideline:  originally our lounge room was a double garage.  The previous owners turned it into a lounge room and moved the front door from next to the dining room, out to the lounge room - garage conversions seem to be very popular in Queensland, especially the area where we live - they're everywhere!  What was left behind was a patched up wall inside (outside was probably patched also, which is presumably why the previous owners rendered the front of the house, although why they didn't continue the render around the sides and back is beyond me… but a story for another day!) and this lovely patch of tiles where the entrance used to be (on the right in the photo below).  I think the concrete strip indicates that there was once a wall there also :)


In the kitchen we had a very large patch in the corner where there was once a doorway into the laundry/garage - you can't see the floor in this photo, but basically that curved line on the ceiling indicates where the doorway used to be, so picture that on the floor with bare concrete from there back.  The area under the fridge and freezer was also bare concrete.


Now you have the full before picture in your mind, lets move on!  (I must also apologise in advance for the quality of the photos that will follow... still saving for the digital SLR!)  With the colour scheme that was there, the house really had a late 80's early 90's feel about it, so I immediately set about exploring flooring options that would really bring our house into this century.  We liked the idea of a hard floor all the way through (as opposed to carpet which holds a lot of dust).  We looked at retiling the whole house… Pretty darn expensive (even if we tiled over the top of the existing ones - because apparently we could since our house is on a slab, but I have seen tile on tile 10 years later and although there are success stories, there are also definite failures - too scary!!)  I decided to head up to our mate Harvey Norman and see what they had hanging around in our price range….  I wasn't exactly sure what our price range was yet, but I knew it had to be cheap!  I looked at all the cheap laminate flooring options… nope, didn't like them.  And then this flooring started to call me from across the room….  Krrrriiisssppyyy….. Krrrriiisssppyyy..!!! 


Image from http://www.ekowood.com/

Isn't it lovely?  It's Ekowood 'Fine Winter'.  As I stood in the shop gazing at it, I was already picturing myself gliding across it from my bedroom into the kitchen to make my morning pot of tea and pouring it into my Royal Doulton cups… light streaming in airy white curtains, sitting gently on a big, soft sofa, surrounded by my tasteful modern decor (cue sound of needle being ripped across the record!  Anyone who knows me well knows that I don't glide, and I don't sit gently! Lol)  OK did I mention that I wasn't sure what my budget was yet?  Well at this point I also wasn't sure what my square meterage was either, so I grabbed a brochure from the salesman who very helpfully informed me that it was on sale at the moment (yippee!!!!  Must be fate!) and hightailed it home to get busy with the measuring tape! 
The next half hour was spent measuring, measuring, measuring… then calculating…. subtract the 5… carry the 8….. add the underlay…. and…. WHOA NELLY!  $14,000 to cover our floors in this wonderful timber?  Seriously?  I didn't recall the salesman mentioning it was made of 18 carat gold, so I did all my sums again…. And yes, it was right - and I hadn't even added the cost of labour or the edging stuff (sorry I don't recall what its called… I was too traumatised!)  Did I say fate?  I meant total and crushing disappointment :'(   I didn't know what my flooring budget was yet, but I was almost 100% sure that this would blow it significantly! 
Back to the drawing board….  And this time let's start with the budget!  Boofy and I put our heads together and figured out that we weren't going to get our dream flooring, or anything even close.... so if we could make the most of what we had rather than changing all the flooring, we would have more money to spend on other things and perhaps do a few projects that we weren't originally going to get to (like the retaining wall for the vegie patch, or extending the shade structure out the front).   So we decided that the cheapest option would be to live with our pale terracotta colour tile throughout the house and fill in all the bare cement areas, redo the area that was currently teal green, and tile the lounge room in the same tile.  But when we went to the cupboard garage, the cupboard garage was bare!  (So to speak).  We had a grand total of 4 spare tiles in the garage… I'm all about making things go further, but it definitely wasn't going to do it I'm afraid!

We picked up our friend Terry the tile and carried him all over the Gold Coast… and I mean everywhere!  If there was a person with a tile to sell, he got an introduction to Terry!  We heard the same thing over and over again from every new place - each person dated the tile bang on (around 15 years old) and said it was a generic import and we had about as much chance of finding another one as June Dally-Watkins has of shaping Julia Gillard into a well spoken lady!  But still we persevered, just in case there was some hoarder with a big pile of this tile sitting in a storage container somewhere (you never know, right?)  At this point, our enthusiasm waning, we conceded it would be best to carpet the lounge room (big bang, less bucks) so that at least we would be looking for a smaller amount, should we miraculously find some more of Terry's clan!  So as you know, we carpeted the lounge room in a cheap sisal (with a carpet square rug in front of the lounge) to get us through the next couple of 'crazy little boy in the house' years!  So to re-cap, the lounge room went from this:


To this:


Much better, right?  You can't see the whole room in this shot, but the carpet actually goes all the way to the four corners of the room - hooray!  But shame about the rest of the house.. it was still looking like some sort of odd patchwork quilt!
In between all of this, we contracted Kitchen Connection to redo our kitchen.  They moved walls and put cabinetry in different places, which covered some of the bare cement, but left gaping holes in other areas… sigh... so we were back to square one on the tiling front.  In the end, we decided we just couldn't keep up the search for Terry's family forever (especially when it seemed so fruitless)...  Terry was devastated, but reluctantly understood.  We found a tile that was a bit darker and decided we'd fill in the gaps and cover the new darker tiled areas (in the kitchen and the old entryway) with rugs of some sort.
We got ourselves a tiler - an agreeable, talented and professional young man called Ryan - who we were told specialised in small jobs, which was perfect for us.  We spoke to him about our whopping big gaps and he agreed to fill them in with our chosen tile.  I also procured a stone border tile to go on that bare concrete step between the lounge and the dining room, and decided since we were left with an odd gap underneath the dining room side of the bench, we should put it in there too (rather than cutting up our darker tile and putting a line down there - the white border tile looked more deliberate I thought).
So we arranged a time with Ryan to do all the tiling…. and he did.  And then it was done…  And it wasn't anything against Ryan, but we were underwhelmed with the result (not the tiling result, which was fantastic, but the overall look)….  Especially in the kitchen... so I promptly threw a big jute rug over the top and that was that.  I know you can see what's coming, can't you - we'd just paid all this money for a brand new kitchen, and then we put a mismatched checker board floor of crazy tiles down and covered it with a jute rug… hello!!!  I loved the way the jute rug looked with the kitchen mind you, but mismatched tiles poking out the sides?  Not a good look…..  Its hard to see in this photo, but if you look closely you'll see that the tiles poking out of the left hand side are much lighter than the ones poking out of the right hand side.


Meanwhile though, I was loving my new border step…. Awesome! 


And I think the border tile along the bench was the perfect solution also:


After a few weeks of mentally kicking myself for my stupidity (because its not as though several people hadn't suggested this to me!  But did I listen?  Nooooo.....), I called Ryan back and asked if I could pay him for another whole day or two to rip up all the tiles in the kitchen and lay a completely different tile.  And if he could get any of the existing (older) tiles up intact, then replace the dark ones in the old entryway - even better!  Again he agreed to do his best (I told you he was agreeable!)  I went shopping for tiles again.  I bought a tile that had the same sort of pattern/texture on it as our existing tiles, but a totally different colour more in keeping with the kitchen, and a different size (so lining up wasn't an issue).  I wasn't 100% but Boofy liked them, so we were also systems go.  I also bought more of the white stone border tile to put across the entry to the kitchen to separate old and new.
So Ryan came back again to rip up his previous handy work and lay my boxes and boxes of  new inconvenience tiles!  And a wonderful thing happened….  I was out of the house with Alex (I can't deal with tile dust and figured it wasn't good for Alex either) when Boofy called to tell me that Ryan had managed to get about 20 of our existing tiles up from the kitchen completely intact!  And he would be happy to rip up his previous handywork in the old entry way and re-lay them there so that all of the floor (with the exception of the kitchen of course) would now be the same tile, with no need for oddly placed rugs!!  Hooray for Ryan!!!  (By the way, if you're local and you want Ryan's number, leave me a comment and I'll get it to you!  He really is very, very good!  How many tilers do you know that would try really hard to get tiles up intact?  Not many I'm waging...)
When Ryan had worked his magic (for the 2nd time) on our floors, this is what we ended up with.  An entry way with no clue that there was ever anything other than these tiles there:


And a completely retiled kitchen that now worked in well with our new cabinetry:


But stepping into the confessional here... I won't lie...  I kind of think the tile in the kitchen is more like something my Mum might choose (case in point - she absolutely loves it!! Lol) but even though I would have loved to go way more adventurous in there, we had to make it work with what we already had, so I think we did pretty well under the circumstances....  But it does annoy me....  A tiny little bit....  Don't tell Boofy, but there is every chance he may come home one day and find the jute rug back in the kitchen (it did look good there after all!)  but at least the tiles that poke out the sides will be nice and uniform!  Bwahahahahaha!!!
Bye for now :)

Wednesday, January 26, 2011

honouring nanna's treasures - part one...

Before my Nanna passed away (which was a little over 2 years ago now) she passed onto me some of her most treasured homewares and told me the stories that went along with them.  Among them are her dinner set, silverware, a gorgeous set of pretty flower tea cups (which I have loved since I was just a little girl - occasionally I used to persuade Nanna to let me drink from them!  Lol), and her one and only 'true' antique (her words) - a tiny delftware plate.
Since we moved into this house, I have been looking for a place to put them that will honour what they meant to Nanna, and what they mean to me.  The obvious place to me is this cabinet which currently sits in our dining room:


Looks like the ideal spot doesn't it?  Shame about it being packed to the rafters with books and other crap though!  So what's a girl to do?  Well, if you're anything like me, you will procrastinate for a year and mentally berate yourself for doing your Grandmother's treasures such a disservice, while doing nothing to actually physically rectify the situation!  Then, after a year or so, you'll start a blog which will get you motivated to actually do all those projects that have been hanging around for ages so you can post about them.... hooray for blogging!! :)

So that brings me back to the situation above - a cupboard full of books which I need to empty, and nowhere to put them.  Obviously we needed another bookshelf to move the books to, and the obvious place was a big vacant patch of wall near the back door, which sits between the guest bedroom and Alex's bedroom.  It has a couple of cupboards on one wall at the moment (which are desperate for both a good clean out and some lining on those translucent doors so you can't see the mess within, but that is a project for another day!) and one big free wall, to the left in the photo below.  (Don't mind that you can see where Boofy is currently up to with painting the living area! Lol... the aqua isn't staying!)


I had a brilliant plan to put in a low bookshelf and then do a big family tree on the wall above it similar to the one below - this one is in chef Guy Grossi's house and the image was from a feature Better Homes and Gardens did on his home - isn't it awesome??  I love it so much!!


(Image of Guy Grossi's house from Better Homes & Gardens TV show, Channel 7)

With that in mind, I went searching and it seems that these were my options.  The first (my preferred option) was from Super Amart - the Madang bookcase.  I liked it because it was the perfect height, and it was made of wood.  Everything from the kitchen back is white furniture, and our dining suite and cupboards up the other end are wood, so I thought the wood down that end as well would balance things out a bit.  It retails for $249.95, but when we enquired, the new delivery was apparently sold before it arrived, so it was going to be at least a month before we could get it home, and I'm just too impatient.  Truth be told, it was also more than we wanted to spend.  Nice though, isn't it....


(Image from Super Amart website)

So next was my second home, aka Ikea.  The Expedit shelving is always a good option (Super Amart also have a slightly more expensive but lesser quality version called Vault which we have in Alex's toyroom) so we definitely considered that also.  This is what I'm talking about, but imagine it tipped sideways, so its long and low:


(Image from Ikea website)

But even though this one is only $119, it still just wasn't really doing it for me... I realised it might hold all my books, but it wouldn't hold any magazines or anything decorative, there just wasn't room.  Back to square one.

So on a recent trip to Ikea with my friend Julie, we were checking out the shelving options and I was dismissing everything in sight, when we happened upon the Lerberg.  At $29.95 each I could buy two of them and still bring the whole thing in at under $60!  Amazing!  However, at 148cm tall, I couldn't have these bookshelves and my Guy Grossi inspired family tree... so I dismissed this option and kept going, leaving empty handed and commenting to Julie that I'd probably regret not buying them.

Sure enough, a week or so on, I'd looked in earnest and found nothing that was such good value and fitted so well.  So what did I do?  I gave up the dream of the family tree above the bookshelf, got in my car and hightailed it back to Ikea.  I bought two sets of white shelves (in flatpack of course) for my books - and what the hey, I bought two in charcoal as well for our outdoor area (more on that another time).  I came home and put those flatpacks together in record time, moved them into position and..... they didn't cover enough wall space, and wouldn't fit all that I wanted to add to them - d'oh!  So the very next day I hopped back in the car and went back for more sultanas another shelf.  Again I put it together and it joined its buddies - sooooo much better :)

Then came the fun task of transferring the contents of the glass cupboard onto my new shelves, and prettying them up a bit.  So after a whole afternoon of shifting books, here is the end result:


What do you think?  Even though it looks a little more cluttered than I'd probably like, I have to say I'm actually quite pleased with it.  And the whole thing still came in under $100 - woo hoo!!  And just as an aside - you see the little owl on the middle shelves?  Isn't she cute?  My stepmum, Heather, recently bought her for me and sent her up from Melbourne....  she's sitting with my Harry Potter books, I call her Hedwig - I'm nerdy like that!!! :)

And that brings me back to the glass cabinet which now sits empty, begging for some treasures to adorn its shelves....  I'd love to say I found a spare 6 hours to go through the boxes, wash all the contents and pack them lovingly into their new home, but it just didn't happen.  Plus I need to find some racks that will accommodate the various plates and platters of the dinner set - so that will have to be part two, I'm afraid.

I know I say this every post, but the photos really don't do it justice (still saving pennies for that new camera - will be for a while yet I think!)  One day someone with my dream camera will come to stay with us and I'll re-photograph everything... then you'll see our house's true colours!

Bye for now :)
Saturday, January 22, 2011

pimp my lounge...

Our lounge room was one of the first rooms to be made over when we moved in.  I've mentioned my bro, Mick, before and some work he's done around our house.  To put it in context, what actually happened was this.  My brother Michael is reeeaaaallly good at all that handy hands on stuff (that I suck at, and
Boofy wasn't great at at the time, but is getting better at by the day)...  When we moved in here, we had neither the time nor the expertise to change the things we wanted to change, and it was going to cost us a lot of money to hire all the different tradies that would need to complete all the different jobs (not to mention the amount of time coordinating them all, taking time off work to be here when they came, and then crying in frustration when they didn't turn up at said time!)  Mick was between jobs at the time, so we offered to pay his flights and pay him a wage to come up here (from Sydney) to do whatever he could get done in the almost-three-weeks that he stayed.  What Mick got done in that time was amazing, and if you continue to follow this blog you'll see heaps of his handywork!  So when I say Mick did this or Mick did that, you know the story behind it now :)

Well, back to the lounge.  So when the house was on the market, the lounge room looked like this:


Its hard to see all the details.... so let me fill you in.  This actually used to be a double garage....  The front door was originally located in our (now) dining room, but more on that later.  So the carpet was an old, cheap, stained synthetic loop style carpet complete with staples on the edges to cut your feet and did not cover the whole floor.  That little decorative patch of yellow near the front door is actually bare cement painted with paving paint - and in front of the window it was just bare cement, full stop.  The step up into the next room?  You got it, bare cement!  There was no trim around the windows, missing bits of skirting and cornices and a huge bare gyprock wall (not show in photo), not to mention all that patching and plastering we needed to cover, and the dreaded pale aqua paint that is all through this house!

So, firstly Mick set to work.  He put the trim around the windows, put on the required skirting and cornices and primed all that trim and the bare gyprock to within an inch of its life!  It sounds simple but there was soooo much to do in this room, it was a big job.  So after that Boofy got to getting some colour on those walls - half Dulux Self Destruct.  Truth be told, we went crazy and bought enough to paint the entire house in that colour (because we liked it) but I actually think its a bit warm... sssshhh, don't tell Boofy!  If I could do it again, I think I'd go with something that was a bit more gray.... something with green undertones rather than yellow.  However, my hubby has worked super hard on the paint job, and I'm very grateful, so I'm keeping my mouth shut and living with what we have! :)

After the painting was done, we looked into flooring.  It was going to cost us a fortune to tile or put down floor boards (my personal preference) so in the end we went for carpet (Boofy's personal preference - he likes a carpeted lounge) which was less than half the price of the other two options.  We opted for something hard wearing, good with stains and on special!  We figured Alex is still pretty young, so it will probably get a bit trashed and that's okay.  For the price we paid, we're fully prepared to replace it in 5 years when Alex is (hopefully) a little more careful!

We got our lounge on ebay a while back, when we were still living in our old place, and it fit perfectly in here.  Only problem for us was we have great expanses of wall to fill... it was going to cost us a fortune!  That's when I lucked out and found this bamboo screen in Vast Interior which would fill about 3.5 metres of wall for only $140!  Sold!  Check it out, it looks great with the lounge:


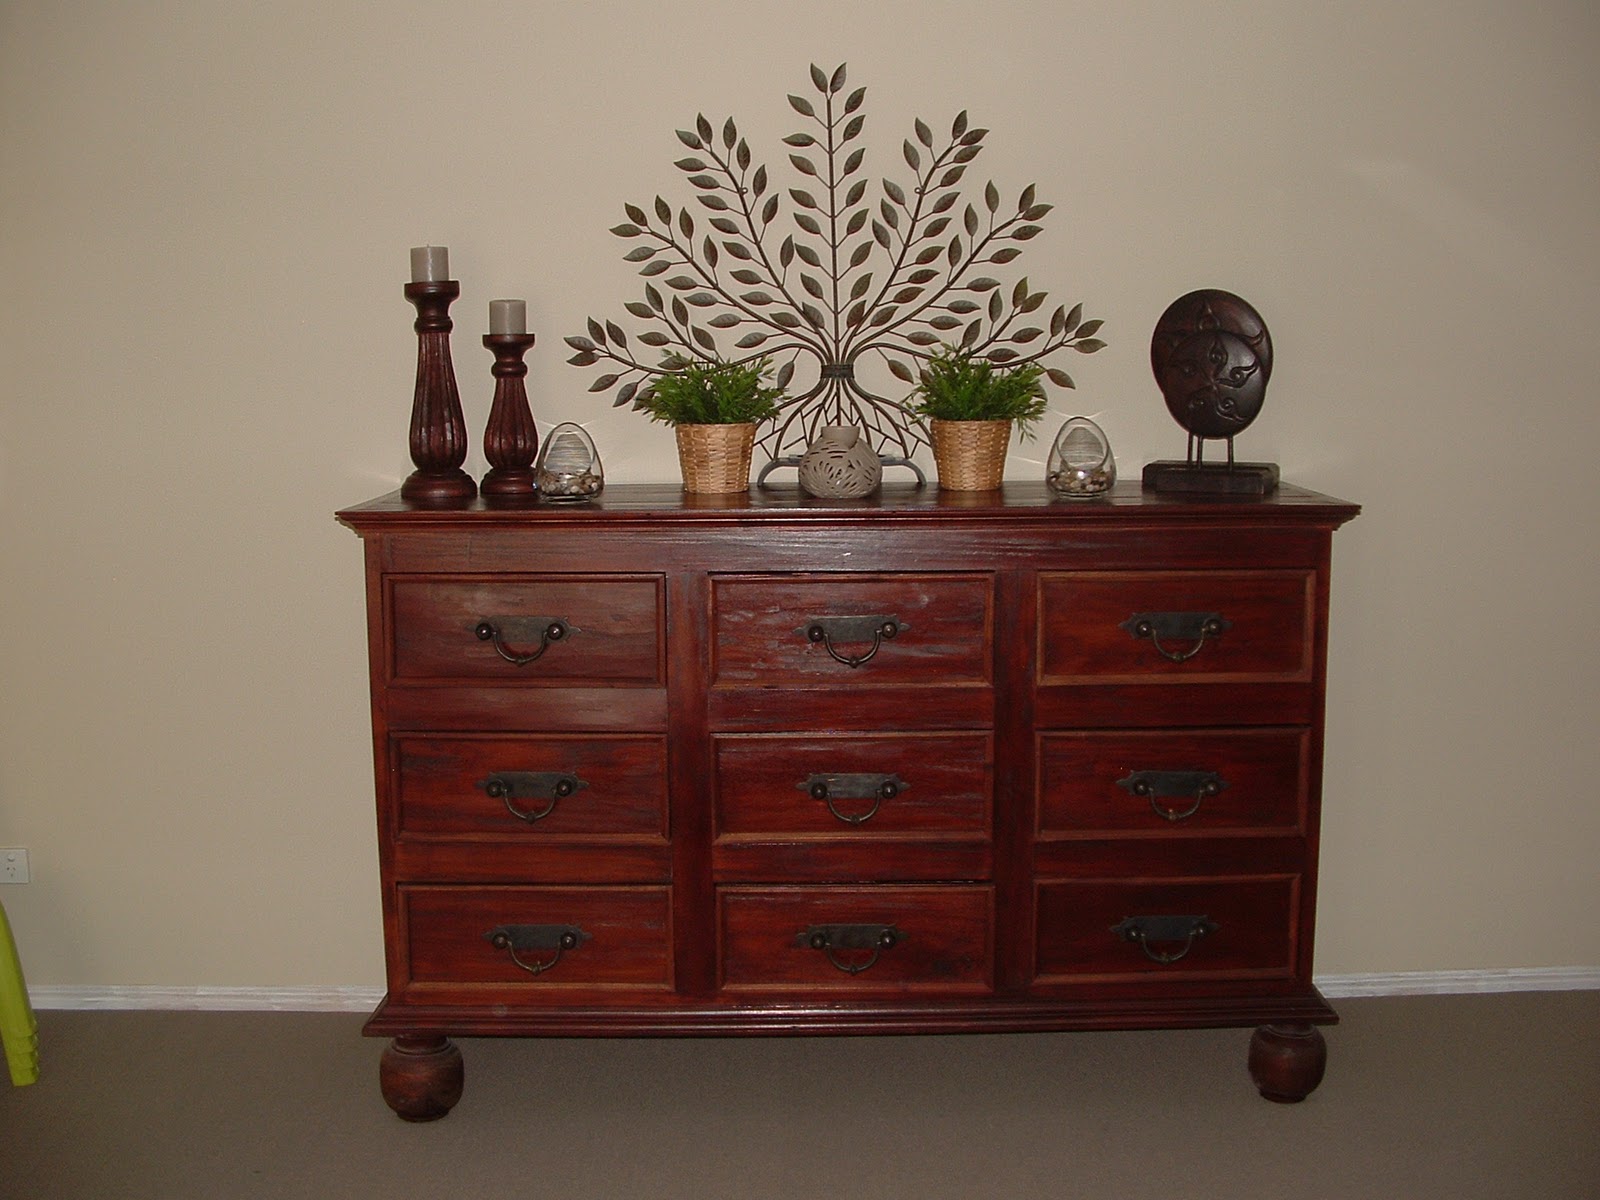
What to do on the other 7 or so metres of bare wall?  Fortunately I work for a large company which has its own intranet, complete with a Buy Swap and Sell section...  with thousands of employees someone is always selling something useful.  And that is where I picked up this cabinet, which I absolutely love, for a total bargain.  The photo doesn't do it justice and doesn't really convey the sheer size of the thing - its enormous and so heavy!  Its very useful too, all our DVDs are in the drawers.  Its the perfect size to line them, spine up, so we can see what they are at a glance. 

The metal tree on top was given to me by my Dad and Stepmum for Christmas (thanks Dad & Heather!) - it was something I spied when I last visited them in Melbourne, and Heather remembered :)  Come to think of it, the wooden discs on the right hand side were the same thing, I spied them in Melbourne and again Heather remembered!  Isn't that sweet?  And the candles on the left were bought by me in the same shop in Melbourne last time I was there....  (sidenote:  Dad and Heather live in this arty little suburb outside of Melbourne called Warrandyte.  City dwellers flock there on weekends to picnic by the Yarra, enjoy the great shops and cafes, and go the the awesome markets.  Its a really leafy beautiful little part of the world, and is .quite close to the Yarra Valley which is very handy!  I can't recall the name of  the particular shop that my metal art, candlesticks and wooden discs came from but hopefully Heather will fill me in and I can update this post - its an awesome shop.  It is so cheap, its really incredible!  If you're out that way and share my passion for homewares, you must check it out!)

Anyway, here is the cabinet!  (Ignore the green kiddies chairs I happened to have stacked in the corner when I took the photo!)


So everything was in.... but it was all looking very, well, beige!  It was wonderful over Christmas when everything was decorated, but now that its all put away, I was feeling a little depressed.  (Does anyone else get like that?  Like things are drab and boring once the Chrissy decs are all gone?  I get sad every year...)  Anyways, I'm not huge on colour, but I'm having a bit of a love affair with green and turquoise at the moment, and I found these cushions that were perfect!  The blue swirl one behind is from Far Pavilions and the colourful one in front is by Kas (I bought them from Samsara).  Aren't they gorgeous?


I was then lucky enough to find the same ones in a big floor cushion, which brightens up the bay window a bit, and is perfect since Alex likes to sit there and watch the world go by sometimes (or wait for visitors if he knows they're coming!)


I then put some candlesticks on one side table and a mirror photo frame with some capiz lotus flowers on the other side table.  For my big cabinet, I got these great glass candleholders, I put pebbles in the bottom and then just popped some tealights in them.  And a couple of fake Ikea plants for colour (I know, I'm a shocker... I never thought I'd have fake plants but I'm just in love with these ones, they just add some nice green and they're so cute... you will see them scattered around the house in many photos, lol!)  So now the cabinet looks like this - much better with a little bit of colour (photo doesn't really do it justice - I love my current camera but it is getting on and getting a bit outdated, we're saving for a digital SLR!)


And now the lounge area looks like this... heaps better with the colour in the cushions to cool it down a bit.


There are other things in the room that aren't in the photos, so you can't really see the whole thing (like the front door, my nanna's little old table and the tv cabinet) but one of these days I well get around to doing a video house tour so you can see it all and get more of an idea of the size of this room (its a huge room - the lounge itself is 4 metres wide so gives you an idea). 

Bye for now :)

Friday, January 21, 2011

budget bathroom renos...

We have two bathrooms in our current house - the main one (which is tiny) and our ensuite.  We didn't want to do full on renovations as it would have probably cost us $10k or more for them both, so we decided to make the most changes we could within our budget.  In the end, the main bathroom ended up costing us around $700 and the ensuite cost us around $1300.  I'll give more explanation of what we changed below.

Here is a picture of what the main bathroom looked like before we moved in.  Be sure to notice, won't you, the peach coloured walls, gold shower frame with tinted doors, gold frame mirror, two tone (chrome and gold) tapware, raw pine shelf and wooden towel rails... 


I wasn't wild about the tile colour (being beige in the shower and vanity splashback and green on the floor (as well as a feature of green running through the shower).  The floor tiles were grouted with cement, so they looked dull also - but because of the cement, regrouting is a big job (as we found out in the ensuite) so we decided to live with those for now.  We are thinking we'll do a full reno on this bathroom in a couple of years and somehow incorporate the wasted space in the separate toilet next door.

So in the end we (and when I say we, I mean Boofy) painted the bathroom plain white to get rid of that horrible peach!  The next big thing we did was get rid of that ugly gold-framed shower screen - instead we installed a swing panel frameless one.  We had one of these at our last place and really loved it, and we loved how it opened up this room and made it look so much brighter!  We changed the old tapware with stuff we got fairly cheaply from Bunnings (fitted by my brother Mick who was here on a working visit) and replaced the old mirror with a budget silver-framed mirror.  Last to go was some horrible black plastic knobs on the vanity, which we replaced with sleek silver handles.  I then bought the bench from Ikea which gives good storage (the basket underneath holds Alex's bath toys) and a place for people to lay out their clean clothes while they're showering.
And this is the end result - so much lighter!


Now onto the ensuite (which is actually the opposite order in which we renovated them!)  This is what we started with....  features to point out are of course the same gold framed shower and mirror as the main bathroom, and same two tone tapware.  Also note the wooden toilet seat (which was also cracked) and wooden shelves, and of course lets not forget the peach walls :)


In the ensuite we did a little more than the main bathroom.  Firstly, we got the tiles regrouted.  The grout on the floor was dull (we later found out it was cement, which explained a lot) and the grout and silicone in the shower had holes and was dirty.  I found a local guy who was just starting out and agreed to do the whole bathroom for $300 (he eventually wished he'd never met us and I'm sure is considering a change in career now!)  So Shane set to work getting the old grout up only to discover, as I mentioned, that the grout on the floor was in fact cement - this posed a big problem since his tool for getting up the grout couldn't handle it, so he had to get it up out of the floor with an angle grinder.  Unfortunately for us, he didn't actually consider a lot beyond what he was doing in the bathroom, so no drop sheets, or even closing the door to the ensuite.... right outside our ensuite is our walk through wardrobe and of course the master bedroom, so I don't need to tell you what I came home to!  Luckily Mick was here and realised what was going on about 20 minutes into his angle grinding efforts, so he did his best to cover up what he could, but it was still VERY dusty and took us what felt like months to get rid of!

So regrouting finished, we powered on.  I bought a new vanity and got it delivered, only to realise the drawers were on the wrong side (and would clash with the plumbing) so had to take it back.  The store I got it from would only do credits, and all their vanities had the drawers on the wrong side for us, so what to do?  In the end, we spent our credit on a vanity top, a frameless bevelled-edge mirror and some flash tapware.  In between I also fell in love with a stone mosaic tile (same as the one in the kitchen splashback but little squares instead of stripes) which we decided could go above the existing vanity splashback.  Again, Mick the master handy man installed the vanity top, mosaic tiles, tapware and mirror.  (You'll have to excuse my photos, obviously I don't have the wide-angled lens that the photographer had!)


We bought a kit with a new cistern and toilet seat and Mick also installed those in both the ensuite toilet and the main one.  I bought some glass and chrome shelves from Bunnings and put two above the toilet, and one inside the shower (which looks great and is fantastic storage).


And the last thing we did was rip down the horrible ugly gold framed shower screen and get ourselves a new semi-frameless one...  what a huge difference!  The photo doesn't really do it justice, but you get the idea :)


So there you go!  Bathroom renos on a budget.  The tiles in the bathrooms are definitely not what I'd choose if I got to redo the whole thing again (neither are the vanities) but they look clean and much more modern now, so we're pretty happy with them for the time being!

Bye for now :)